Growing Pleione from Seed - Part 1
Like most orchids, Pleione cannot be raised from seed by merely sowing seed on a standard seed compost. They need to be sown in sterile flasks (jars) on a special, sterile medium. Once the preserve only of laboratories with specialist equipment, increasingly amateurs are successfully having a go at home using makeshift equipment. Here I describe in outline how I have gone about this.
1. Obtaining Seed
It is most exciting to make your own crosses and thus produce new, unique hybrids. The first step, once you have decided upon the parents, is to pollinate one with another. As a general rule, I wait to take pollen off a plant until at least 5 days after the flower fully opens, because the pollen isn't mature before then. You can take it later, any time up until the flower starts to fade, though if you wait until the flower is visibly fading, it may be too late and if the pollen looks at all brown in colour it will be useless. The flower to be pollinated should have been open for at least 3 days. This is how to do the pollination:
This first picture shows a flower of Pleione saxicola:

Pleione saxicola flower
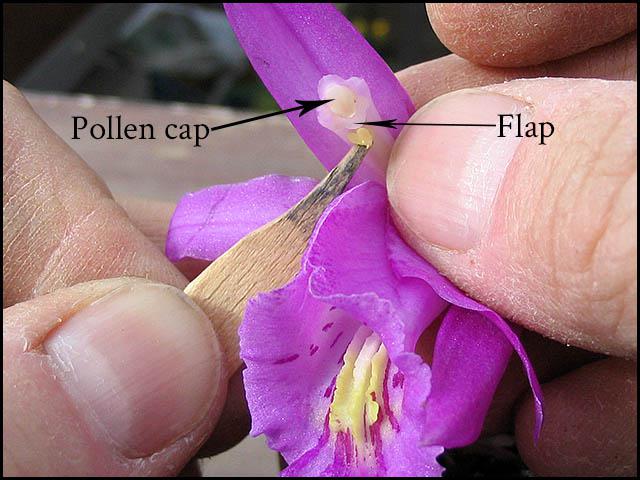
In this next picture I have cut away a petal and part of the lip to show the "column" inside the lip (this is labelled in the photo). The column is part of the reproductive structures in the flower. At the very end of the column is the pollen cap (also labelled).
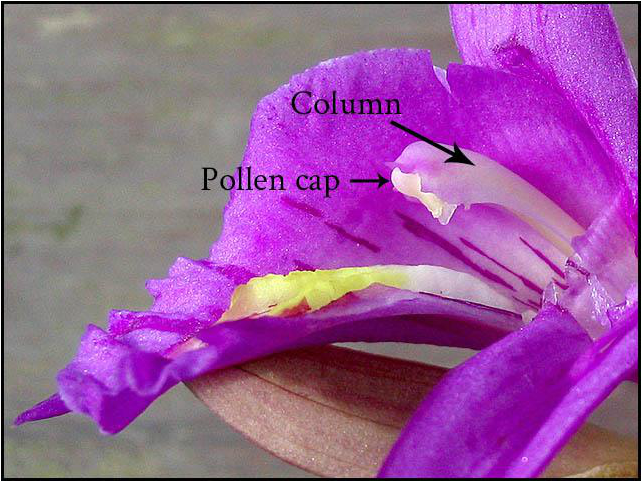
Pleione saxicola flower cut open to reveal the column
The pollen is inside the pollen cap. In orchids the pollen is usually not a loose powder, but all "glued" together into lumps called pollinia. In Pleione, there are 4 pollinia, arranged as two pairs, one pair on each side of a divide down the middle of the pollen cap. I use the cap from a
ball-point pen as a conveniently shaped tool to remove the pollen
cap from the column. This next picture shows this about to happen:
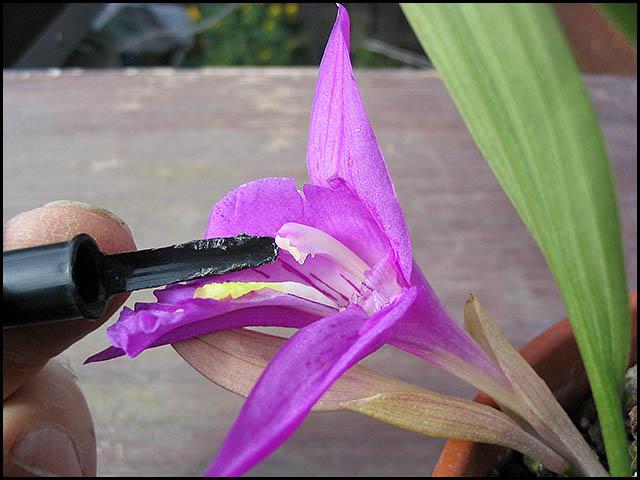
Removing the pollen cap from the column
You just push against the pollen cap with the pen top and it comes away to rest in the groove of the pen top as shown in the next picture. (The pollinia actually fell out of the pollen cap as I did this, so the pollen cap looks empty in this picture. For the next photo I got the pollen cap off a new flower to show the next step).
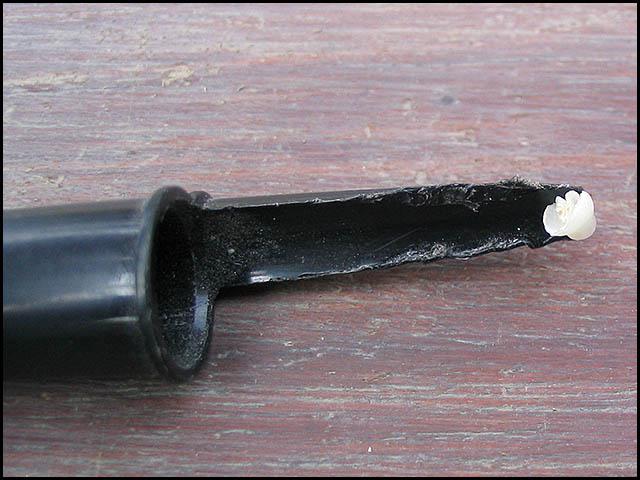
Pollen cap removed from the column
Next I use a needle to remove the yellow-coloured pollinia from the pollen cap:

Removing Pleione pollinia from the pollen cap
The bottoms of the pollinia are often sticky, which helps to stick them on the back of a bee's head during normal pollination. Here is a closer view showing the pollinia after removal from the pollen cap:
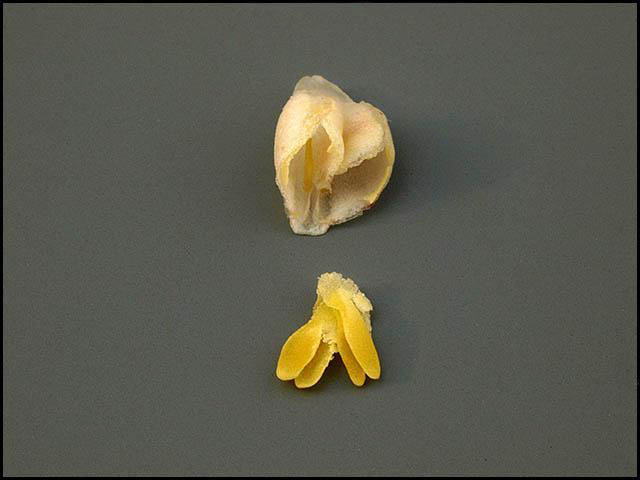
Pleione pollinia removed from the pollen cap
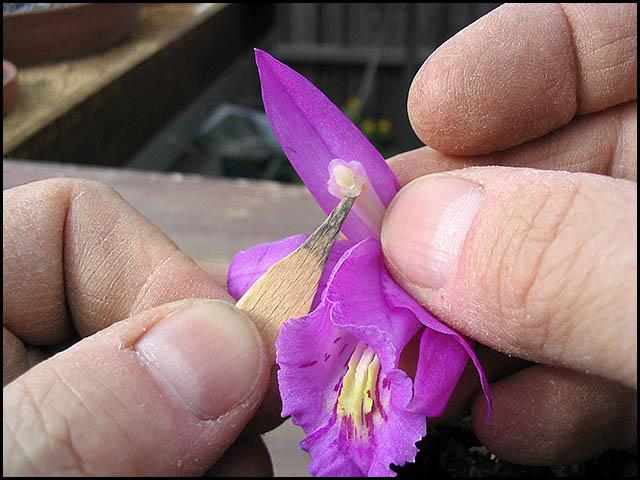
The next step is to place the pollinia on the stigmatic surface. (I use a wooden lolly stick sharpened to a blunt point for this, as the needle can be too sharp and may damage the stigmatic surface). The next picture shows the flower I intend to pollinate. Normally I remove the pollen cap from this first, before pollinating with the pollinia from the other flower. But I have left it in place here so you can see just where it is and also see behind it a small "flap" - both are labelled in the photo.
Placing pollen behind the "flap"
Behind this flap, on the underside of the pollinia, is a small, often roughly triangular shaped patch which is the stigmatic surface. If ready to receive pollinia, this patch is sticky. I lift up the column from inside the lip (so I can see what I'm doing) and using the wooden stick mentioned, I push the pollinia up behind the flap onto the stigmatic surface:
Pushing the pollinia behind the "flap" on to the stigmatic surface
If the pollen doesn't seem to want to stick on, it usually means the flower is too young and you need to wait a few days for the stigmatic surface to become sticky. It probably helps to do
the pollinating in the morning of a fine, warm day - the kind of day that bees
would normally be flying. If the pollination has been successful, you will
notice that in most cases, after a few days, the column actually moves
downwards inside the lip of the flower to lie flat against the bottom of the
lip, as in this example (which is the hybrid Pleione Muriel):

Pleione Muriel after pollination with descended column
Sometimes the whole flower also droops after pollination. These mechanisms prevent further entry by pollinators. The pods then develop through the growing season. Here is what a typical pod looks like about two months after pollination:
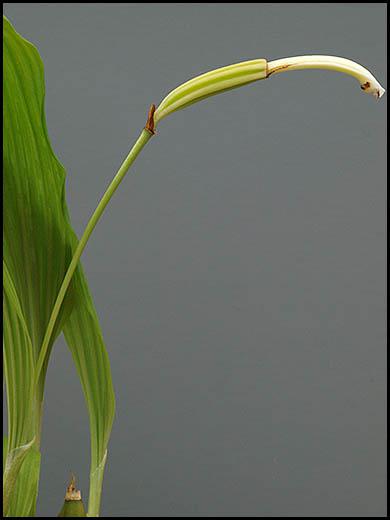
Pleione pod two months after pollination
They take roughly 7 months to mature - though it can be much less or much more than this. Watch for the pod changing colour from green to yellow and finally to brown as it is fully mature. It is easy to leave them on the plant too long and they split open before you notice and you lose the seed - so I usually cut them off once they are yellow but showing the first signs of turning brown. I put them into normal seed envelopes in a warm DRY place (my lounge!) and wait for them to split and spill the seed into the packet. Once the seed has been shed and is completely dry, the packets can be kept in a sealed container in a fridge until it is time to sow.